
There are documents in Excel that you may deem primate, hence should be restricted to only a number of people. This is due to how sensitive the content in the files may be. When you password protect Excel then users need to have a passo
Using Excel File protection is among the most convenient methods to secure your files as compared to other methods. There are several ways to install Password Protect, just as given in this article.
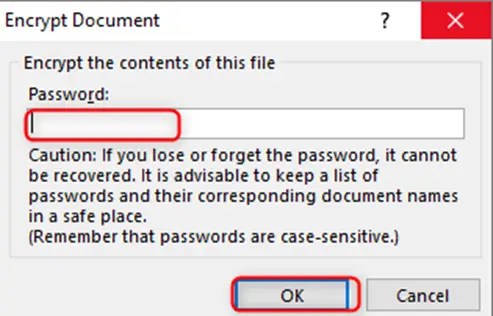
Use encrypt with Password option to protect the workbook

1. Open the document in Excel that you want to secure.
2. Click File and select Info.

3. Click on the Protect Workbook button. Select Encrypt with Password from the choices that appear

4. Type in your most preferred Password just as guided. Pick a strong password, and for future reference, note it to your Password manager. Being able to remember the Password is important

Anytime you want to open your document Excel will prompt you to input your Password before accessing your file. You must note that the Password will not be for every Excel document but only for the individual file. Each file will therefore be required to be Password protected individually if you need all of them to be similarly protected.
Password Protect Excel using General options
You can also use the following steps;
1. Open Save As in the File Tab
2. Open Tools
3. Go to General Options

4. Type the most suitable Password ( strong) in the “Password to open “field.
5. Click OK
6. Verify the Password

7. Save
To know whether you need a password to open a document, check the Info tab for the document, where you can see a section named Protect workbook. You will see if you need a password to access the file or not.
Once you have Password protected your work, you can get extra security by encrypting. Encryption programs are easily accessible as some windows professional users have built encrypting software, or you can access downloadable encryption services.
How to protect the current worksheet
1. Click on File
2. Click on info
3. Click on protect workbook > protect current sheet

4. Enter password
5. Confirm password
6. Click okay
How to remove password protection in Excel
1. Click on file
2. Click on info
3. Click on Protect workbook >> Encrypt with password
4. Delete the existing password
5. Click Okay.
Excel additional security features
There are more customized security options that Excel allows for. The customized additional features are under the protect document.
The additional security features are;
1. Mark as final, marks file as completed. It Lets readers know changes should not be made. It does not offer enough security as the data behind Password is not secured.
2. Protect the current sheet; using a password, guards the current sheet that is selected so that no changes can be made. It protects the document from people making changes until they have a password.
3. Restrict access; is helpful in big groups such as businesses. The restrict access feature restricts people who need not get the data.
4. Add a digital signature ensures you alone can access a file by having a unique signature. Your information is guaranteed privacy and safety.
It is important to secure Excel files, and it should not be overlooked. Password protection will ensure information remains secure and, importantly, private.
How to choose a good password
1. Your Password should not be generic so that no one will easily guess it
2. Add a number
3. Mix Capital letters with small ones
4. Add Symbols
Discover more from Excel Wizard
Subscribe to get the latest posts sent to your email.