
Excel offers its users a lot of inbuilt functions and features when working on spreadsheets. But with the many features, it may become a challenging issue for a novice excel user to understand how all the features work. That’s why we guide you on one of the Excel functions you may come upon as pre-populating cells. In our guide below, we give you different simple steps to follow when you want to pre-populate Excel cells. Let’s get started.
Pre-populate Excel cells automatically using the fill handle
1. Start by selecting one or more cells that you want to use as a basis for filling additional cells.
2. Drag down the fill handle icon. It will be at the bottom right corner of your cell.
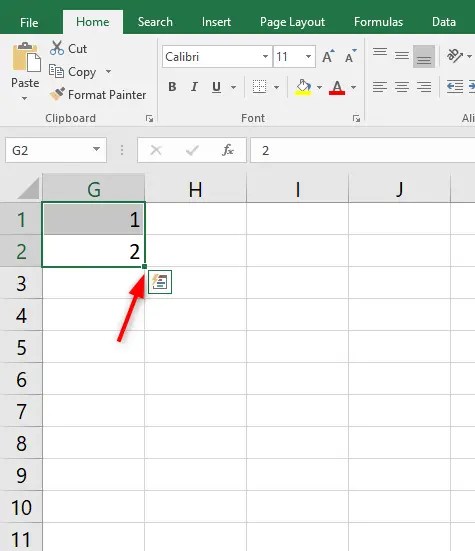
3. You can also decide to click on the Auto Fill Options icon and choose the option you prefer.
4. By dragging down the auto-fill handle, you get to pre-populate your Excel cells faster.

Pre-populate Excel cells Using VLOOKUP
Here you will use the VLOOKUP function in Excel to auto-populate results from a table.
1. Start by selecting a blank cell that you want to auto-populate with a corresponding value.
2. Copy and paste your VLOOKUP formula into the blank cell.
=VLOOKUP (DROP DOWN LIST Cell, table range, column number, FALSE)
=VLOOKUP(E2,A2:B7,2,FALSE)
Note: the table range also includes the lookup value and the results while the column number indicates where the results locate.

3. Lastly, press Enter
Download Prepopulate data from a range using VLOOKUP Template
Pre-populating Excel blank cells only.
You can also fill in the blank cells in your Excel worksheets. Here, there is a specific approach you have to take as the autofill function (+) plus sign will not work. Using it will end up deleting or wiping out all the existing data in the already filled-up cells. To fill up your blank cells in a column with existing data, here is what to do:
1. In your open Excel worksheet, select all the data in the column.

2. In the main menu, go to the Home tab.
3. In the Editing group, click on the Find & Select icon to display a drop-down list.
4. Select Go to Special to display a pop-up window.

5. In the displayed window, select Blanks then press OK.

6. In the window, enter your formula in the first blank cell. In case there is no value to display, just type N/A

then press CTRL + ENTER. The same entry will apply to every blank cell found within the column.

Pre-populating every other Cell in Excel
Below we give you steps to follow when you want to automatically populate data in every other cell in your Excel worksheet.
1. First, highlight the first cell in the column you want to populate.

2. Place the cursor of your mouse at the lower right corner of thefirst highlighted cells until it changes to a plus (+) sign.
3. Hold and drag down the sign to auto-populate your Excel cells.

In cases when you want to auto-populate many cells in your Excel worksheet, here is what to do:
- Open your Excel worksheet and select any two cells in a column you are looking to auto-populate.
- Afterward, hold down the shift key on your keyboard
- You will notice an icon with two horizontal parallel lines at the bottom right corner of the selected cells in place of the normal plus sign.
- Double click on that icon. Doing this, Excel will automatically autofill the entire column. Note, it will only auto-populate the cells in that column to where the adjacent column has data.
Autofill cells by dragging formulas
You can also pre-populate cells in Excel by dragging formulas.
1. Write the formula in the first cell

2. Hold and drag down to the rest of the cells

Discover more from Excel Wizard
Subscribe to get the latest posts sent to your email.