
There are many ways to send Bulk Emails using Excel. These methods range from using formulas, Macros, and Excel Addins. If you are an experienced user, you can use the Macros method. However, if you are not a Sophisticated Excel user, you can choose the non-macros method. In this tutorial, I will guide you on how to send Bulk Emails using Excel.
Benefits of Using Excel to Send Bulk Emails
Save time: if you have a huge list of contacts you need to send unique emails to, it will consume much time. Luckily, you can send bulk emails using Excel within a short period with a click of a few buttons.
Bulk Emails: You can send emails to as many recipients as possible. That means you can use a maximum number of Rows and columns.
Attachments: You can attach documents and other files in the emails that you need to send:
Conditions: You can send emails if certain conditions are met. For example, in this article, we will create a VBA code that sends emails if all the fields, such as Recipient, Subject, and Body, are filled.
Method 1: Using the Hyperlink Formula
You can send emails on Excel by just clicking on a link. The Hyperlink formula uses the Mailto Excel command to populate the necessary fields like CC, TO, SUBJECT, and Body. All these fields form a complete email. This is the best method to use without Macros or using Mail Merge.
1: Create the following fields on your Excel document
Recipient Email Address
Subject:
Body:
Mailto link:
2. Use the adjacent cells to fill in the information
See the image below for how I have arranged and fields and corresponding details.

3. Click on the empty cell next to the mailto Link field and enter the following formula into the formula bar
=HYPERLINK(“mailto:” & C2 & “?subject=”& C3 & “&body=” & C4, “Linking text”)

You can edit the details above if you wish
4. Click on the linking text to send the Email.
Once you click the hyperlink, an Outlook window or your default mail app will launch and prefill all the details.
Alternative Hyperlink Method to Send Emails
In the first hyperlink method, email body characters are limited. To mitigate this issue, you can use this alternative method.
1. Write an anchor text on an empty cell

2. Click on the Insert Tab, then on Hyperlink

3. On the pop-up window, you need to click on Email Address, then type in the email address of the recipient and type the subject

4. Once you click on the hyperlink, an Outlook window will be launched, prompting you to write the body of your Email.

The default email app on your computer will be launched to send your Email. For example, the image below shows a pop-up window for the Mail app to send an email.

Method 2: Using Mail Merge
Mail Merge is one of the easiest ways to send dynamic Bulk Emails using Excel. It is an ideal method to send emails to many customers or companies all at once. In this method, Excel partners with Word and Outlook. Microsoft Word is responsible for designing the email template. Excel holds the recipient’s dynamic details while Outlook sends the emails. This connection is popular among businesses, especially when sending invoices. In this section, I will guide you on how to send bulk emails using Mail Merge.
Step 1: Create your letter Template using Microsoft Word.
I have created an invoice template using Microsoft Word. You can create any type of template, from official letters to just simple letters.

Step 2: Add your recipient’s details on Microsoft Excel
Excel will act as the database of all the variables that we shall use to fill our template above. Create a new column for every variable.

As you can see from the image above, I have created new columns for Customer name, Company name, address Line 1, Services Line 1, Date Line 1, and Services Line 2.
The image below shows the rest of the columns containing other important data, such as the Total Amount, Invoice Number, and Email Address of the recipients.

The best thing about using Excel to send bulk emails is that you can make use of the formulas to calculate the totals for you.
For instance, we have used the sum formula to calculate the totals for the first and second services.
Step 3: Start Mail Merge
Head over to the Word document and click on the mailings Tab>Start Mail Merge drop Down, then Select Normal Word Document.

Step 3: Select recipients
Click on Select Recipients, then choose “Use an Existing List.” Selecting this option will enable us to connect Our Excel contacts to the Microsoft Word document.

After clicking use an Existing List, the file explorer will pop up, prompting you to choose the Excel file containing your recipient’s details.
Next, select the appropriate sheet and tick the option “first row of data contains headers.” Press Okay

The headers will appear in the Write and insert fields as merge fields
Step 4: Insert Merge fields into the template
First, highlight the field you wish to merge on your Word document, then click on “Insert Merge Field” and select the field from the drop-down menu.

Repeat the same for all the dynamic fields.

In case a blank space will hold a variable, just place the cursor on the empty field and click on the insert merge field, then select the relevant field.

As you can see from the image above, I have filled in all the necessary fields.
Step 5: Preview the invoices
We can counter-check to see how each invoice appears to make sure the recipient gets a duly filled and unique invoice.
Click on the option labeled Preview Results.

Use the controls to navigate and view as many invoices as you wish.
Step 6: Finish and Merge
Click Finish and Merge, then select Send Email Messages

A small pop-up will launch. Under the field, choose the Excel column containing the email addresses.
Under the subject line, type in a subject for your emails
Next, choose the format of the Email. You can send it as an attachment, plain text, or HTML FORMAT.
Lastly, select whether you wish to send all the emails or select a number of recipients.
Press Okay to send the bulk emails

The emails will be sent using Outlook. You can open the program to check the status of the emails.
Download The Practice Sheets
Word Invoice Mail Merge Template
Excel Mail Merge Template
Method 3: Using 3rd Party Addin
You can send emails using third-party addins such as Kutools. The best thing about using this tool is that it provides more functions and makes sending bulk emails an easy task. For example, using this method, you can add up to 3 attachments per Email. Follow these simple steps
1. Download and install Kutools for Excel from the Official website
2. Click on Kutools Plus Tab, then click on Create Mailing List

3. A pop-up window will pop up containing all the fields that you can add

Tick on all the fields you need to include in your Email and then click on Create. Remember to tick on Attachment if you want to attach a file to your Email.
4. Kutools will create the following template
 5. Add as many emails as you wish in the fields below the headers
6. Click on Send Emails

Note that Kutools Plus is a premium feature, but it offers enough a few trials enough to send bulk emails daily. However, if you want to utilize other features, you may need to buy a license.
7. An Outlook Window will be launched. Click on the drop-down arrows to select the fields we just created in Excel. Then type the message body in the Outlook editing area

Finally, click on send to send the emails.
8. Once you click to send, all the recipients in the email list will receive the emails.


Method 4: How to send Bulk Emails in Excel using VBA Code
In this section, I will show you how you can send bulk emails using the VBA code in Excel. This is the easiest way to send hundreds of emails automatically using Outlook as the client.
1. Open your Excel file and create the headings on cells A1, B1, and C1, namely, Recipients, Subject, and Body.
2. Add all the recipients in the first column, write the subjects of the emails in the second column, and the body in the third column.

3. Launch the VBA Editor by pressing the shortcut ALT+F11 on Windows or opt+F11 on Mac. Alternatively, you can click the developer Tab on the toolbar and then click Visual Basic
4. Once you open the VBA Editor click on Insert, then select Module

5. Copy and Paste the following code into the code editor
Sub SendEmails()

    'Declare variables
    Dim OutlookApp As Object
    Dim OutlookMail As Object
    Dim Recipient As String
    Dim Subject As String
    Dim Body As String
    Dim LastRow As Long
    Dim i As Long

    'Set the last row with data in column A
    LastRow = Cells(Rows.Count, "A").End(xlUp).Row

    'Loop through each row with data, starting from row 2
    For i = 2 To LastRow

        'Check if recipient, subject, and body are filled
        If Cells(i, "A").Value <> "" And Cells(i, "B").Value <> "" And Cells(i, "C").Value <> "" Then

            'Assign values to variables
            Recipient = Cells(i, "A").Value
            Subject = Cells(i, "B").Value
            Body = Cells(i, "C").Value

            'Create a new Outlook email
            Set OutlookApp = CreateObject("Outlook.Application")
            Set OutlookMail = OutlookApp.CreateItem(0)

            'Assign values to email properties
            With OutlookMail
                .To = Recipient
                .Subject = Subject
                .Body = Body
                .Send
            End With

            'Release resources
            Set OutlookMail = Nothing
            Set OutlookApp = Nothing

        End If

    Next i

End Sub
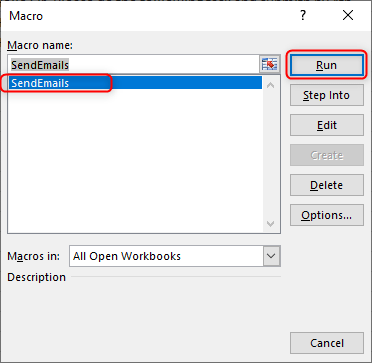
6. Navigate back to the Excel Sheet, click the developer tab, then click on Macros

7. Select the Macros named SendEmails and click run
The VBA code will check all the cells below the headings and send emails. If any row is missing data, it will skip and move to the next cell until all emails are sent. Note that all emails will be sent automatically once you run the Macros. Therefore it is important to confirm everything is ready before running the Macro.
Final Thoughts
This article features four ways that you can use to send bulk emails in Excel automatically. There are Macro and Non-Macro Ways to do it. Additionally, each method is unique to accommodate different types of emails. Let us know if you have any questions in the comment section below.
Discover more from Excel Wizard
Subscribe to get the latest posts sent to your email.